 Bokeping
Enter a vendor bill
Record a supplier invoice that your business still needs to pay.
In BokepingPurchases & Expenses → Bills
A bill records money you owe a vendor. If you have already paid for a purchase and do not need to track a payable, record an expense instead.
Where to go: Purchases & Expenses → Bills → New Bill.
Before you start
Section titled “Before you start”Have the vendor’s invoice, bill date, due date, and line-item details. Search existing bills and references to avoid recording the same supplier document twice.
Enter the bill
Section titled “Enter the bill”- Select Vendor Name.
- Review Bill No., the bill’s unique number in Bokeping. Put the vendor’s invoice number in Reference No. so you can find the original document later.
- Enter Bill Date, Due Date, and Payment terms.
- Under Line items, choose By category for a purchase recorded directly to an account, or By item for a product or service in your item list. Use the guidance below to choose.
- Check Amounts are, discounts, and the total against the vendor’s invoice. Review any inventory or landed-cost treatment before posting.
- Add the vendor’s note in Vendor Memo if useful. Memo is internal context for your team.
- Choose Save as Draft if it still needs work, or Save & Open when ready to record the bill.
- Review the saved bill’s status and Open Balance.
The whole-document Discount (allowance) does not change item costs or the tax base. Use the appropriate line discount for a discount that reduces a line’s cost and taxable amount, and verify the resulting total.
Choose category or item entry
Section titled “Choose category or item entry”| Your purchase | Entry method | What to select |
|---|---|---|
| Office consumables, rent, or another purchase recorded directly to an account | By category | The appropriate expense, cost, or asset account. You do not need to create a product first. |
| A product or service already set up in your item list | By item | The item, then its quantity and rate. |
| Goods whose stock quantity and value you track | By item | The inventory item. Selecting an inventory asset account alone does not identify the stock item or quantity to receive. |
For example, Cedar & Pine receives a $240 bill for office consumables:
- Set Enter line items by → By category.
- Choose Office Expenses & Supplies in Account. Your company may use a different account name.
- Add a description, enter Quantity of 1 and Rate of $240, and review any applicable tax.
- With no tax, discount, or adjustment in this example, confirm Total is $240.
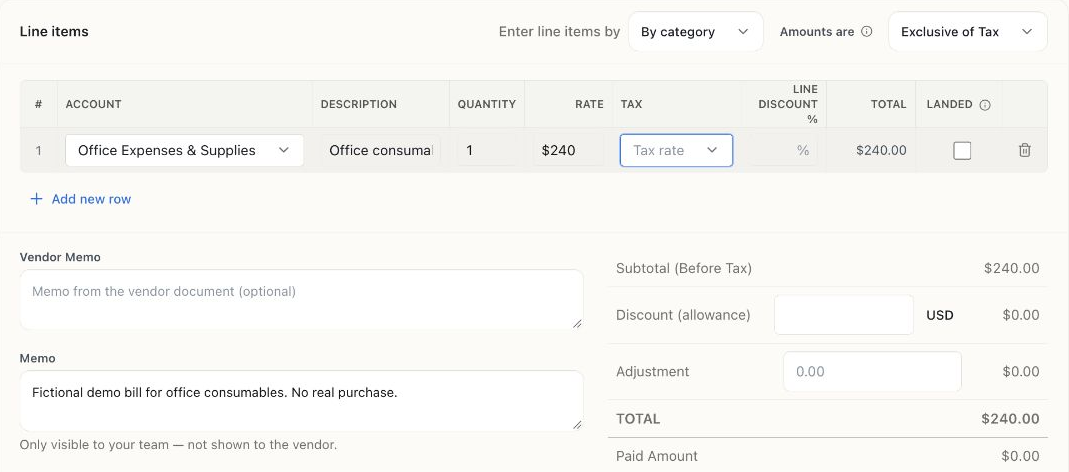
Fictional US demo. This example assumes no tax or adjustments; use the amounts and tax treatment on your actual supplier document.
Check the saved bill
Section titled “Check the saved bill”- A bill saved with Save as Draft remains Draft. Finish and post it before treating it as an open payable.
- For an unpaid, posted $240 bill, verify the bill total and Open Balance are both $240.
- If you already paid an advance, keep the full bill amount and apply the existing prepayment. Do not reduce the bill total or record the bank payment again.
Record its payment separately
Section titled “Record its payment separately”When a bill is paid, record the payment against the bill. Recording a bill payment in your books is not, by itself, an instruction to your bank to send money.
Use Purchases & Expenses → Payments Made to review vendor payments. When bank activity arrives, match it to the recorded payment instead of categorizing another expense and leaving the bill unpaid.
If the amount looks wrong
Section titled “If the amount looks wrong”Compare quantities, rates, discounts, and tax with the vendor’s document. Confirm whether the bill is still a draft and check for duplicates with the same reference before entering it again.
Not sure which record to use? See bill or expense. For installments, see partial bill payments.
If the purchase began with an order, convert the purchase order to a draft bill instead of entering it twice. For a supplier reduction or refund, use vendor credits.
For a spreadsheet of existing bills, use the bill-import walkthrough, including its multi-line grouping example.